Here are the things every developer should know about GitHub:
===========================================
Basics:
1. Installing git
2. Configuring git
3. Creating a new repository (git init)
4. Checking the status (git status)
5. Staging (git add)
6. Commiting (git commit)
Remote Repositories:
1. Connecting to a remote repository (git remote add)
2. Uploading to a server (git push)
3. Cloning a repository (git clone)
4. Getting changes from a server (git pull)
Branches:
1. Creating new branches (git branch)
2. Switching branches (git checkout)
3. Merging branches (git merge)
Advanced:
1. Checking difference between commits
2. Reverting a file to a previous version
3. Fixing a commit
4. Resolving Merge Conflicts
5. Setting up .gitignore
===========================================
And here is the git cheat sheet for you:
Saturday, August 27, 2016
Tuesday, August 23, 2016
Creating a New User in Oracle Database 11g Express Edition
This post describes how to create a New User in Oracle Database 11g Express Edition:
Go to cmd and type sqlplus
Then it will ask you for the user-name and password.
Enter user-name: sys
Enter password: vijaya
It will show you the following error:
ERROR:
ORA-28009: connection as SYS should be as SYSDBA or SYSOPER
So, just try the another role you've created.
Enter username: vijaya
Enter password: vijaya
Now it will say:
Connected to:
Oracle Database 11g Express Edition Release 11.2.0.2.0 - 64bit Production
////////////////////////
Or, if you directly open "Run SQL command line", it will directly go to:
">SQL" instead of "C:\Users\meVeekay>", so you can directly do:
SQL> conn sys as sysdba
and it will ask you for the password. Once you enter your password, it will connect you to the database.
////////////////////////
Now, try sys login as sysdba role:
SQL> conn sys as sysdba
Enter password: vijaya
Connected.
Now, you can create a new user:
SQL> create user vkpandey identified by vijaya;
Once the user is created, you need to give sysdba role to the new user:
SQL> grant sysdba to vkpandey;
Now, it should show you the "Grant succeeded." message.
Now, if you open SqlDeveloper tool and try to create a new database connection with the username and password you just created,
it will display the following error:
User Lacks CREATE SESSION Privilege, Logon Failed
this is because you haven't given the session privilege.
To solve this issue, we can do:
//GRANT CONNECT TO username;
GRANT CONNECT TO vkpandey;
Depending on the Oracle version, however, the CONNECT role has many more privileges than the name suggests.
So good idea is to grant CREATE SESSION instead. So simply do:
SQL> grant create session to vkpandey;
Grant succeeded.
Now you can create a new database connection in Oracle SqlDeveloper Tool:
For example:
Connection name: VKConnection
Username: vkpandey
password: vijaya
Hostname: localhost
port: 1521
SID: xe
Try Test option, it should show you "Status: Success" message.
Now, enter Connect button.
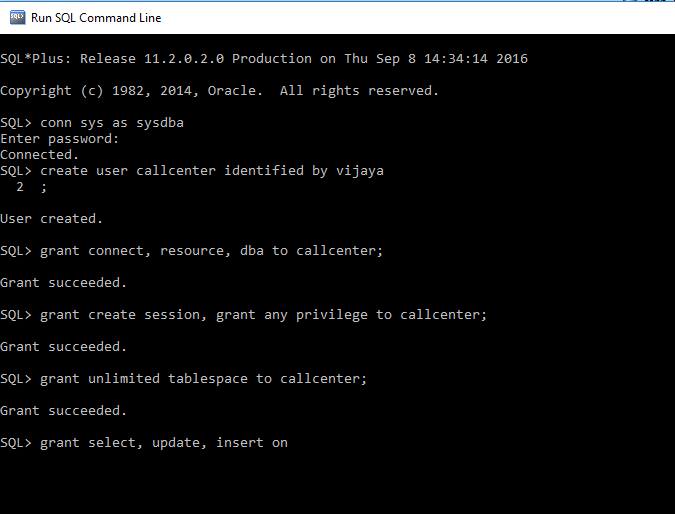
So, in Summary:
Follow the below steps for creating a user in Oracle.
--Connect as System user
CONNECT <USER-NAME>/<PASSWORD>@<DATABASE NAME>;
--Create user query
CREATE USER <USER NAME> IDENTIFIED BY <PASSWORD>;
--Provide roles
GRANT CONNECT,RESOURCE,DBA TO <USER NAME>;
--Provide privileges
GRANT CREATE SESSION, GRANT ANY PRIVILEGE TO <USER NAME>;
GRANT UNLIMITED TABLESPACE TO <USER NAME>;
--Provide access to tables.
GRANT SELECT,UPDATE,INSERT ON <TABLE NAME> TO <USER NAME>;
 |
| Creating a New User in Oracle Database 11g Express Edition |
If you get the following error message when creating a new table from sql developer tool:
java.sql.sqlsyntaxerrorexception ora-01031 insufficient privileges
Run the following command from a privileged user and re-connect with your user:
GRANT RESOURCE to my_user;
//GRANT RESOURCE to vkpandey;
Add Oracle JDBC Driver in Maven Local Repository
Due to Oracle license restriction, there is NO public Maven repository provides Oracle JDBC driver.
To use Oracle jdbc drive with Maven, you have to install it manually into your Maven local repository.
Here’s a guide to show you how to add an Oracle JDBC driver (“ojdbc6.jar“) into your Maven local repository,
and also how to reference it in pom.xml.
1. Get Oracle JDBC Driver
There are two different ways to get the Oracle jdbc driver :
a. go to Oracle.com and find it.
b. Oracle database installed folder, for example, “{ORACLE_HOME}\jdbc\lib\ojdbc6.jar“
that is,
go to C:\oraclexe\app\oracle\product\11.2.0\server\jdbc\lib and find ojdbc5.jar or ojdbc6.jar
2. Install OJDBC driver:
To install your Oracle jdbc driver, enter the following command :
mvn install:install-file -Dfile={Path/to/your/ojdbc.jar} -DgroupId=com.oracle -DartifactId=ojdbc6 -Dversion=11.2.0.3 -Dpackaging=jar
Or,
go to C:\oraclexe\app\oracle\product\11.2.0\server\jdbc\lib and find ojdbc5.jar or ojdbc6.jar
copy ojdbc5.jar file and put in c:\temp folder
open cmd/terminal window from c:\temp folder and enter the following command:
mvn install:install-file -Dfile=ojdbc5.jar -DgroupId=com.oracle -DartifactId=ojdbc5 -Dversion=11.2.0.3 -Dpackaging=jar
Once you execute the code, you will see the following message:
C:\TEMP>mvn install:install-file -Dfile=ojdbc5.jar -DgroupId=com.oracle -DartifactId=ojdbc5 -Dversion=11.2.0.3 -Dpackaging=jar
[INFO] Scanning for projects...
[INFO]
[INFO] ------------------------------------------------------------------------
[INFO] Building Maven Stub Project (No POM) 1
[INFO] ------------------------------------------------------------------------
[INFO]
[INFO] --- maven-install-plugin:2.4:install-file (default-cli) @ standalone-pom ---
[INFO] Installing C:\TEMP\ojdbc5.jar to C:\Users\meVeekay\.m2\repository\com\oracle\ojdbc5\11.2.0.3\ojdbc5-11.2.0.3.jar
[INFO] ------------------------------------------------------------------------
[INFO] BUILD SUCCESS
[INFO] ------------------------------------------------------------------------
[INFO] Total time: 1.220 s
[INFO] Finished at: 2016-07-18T15:41:03-06:00
[INFO] Final Memory: 7M/77M
[INFO] ------------------------------------------------------------------------
3. Now, You are all set! Oracle JDBC Driver ojdbc5.jar is installed in your Maven local repository.
4. Now you can reference it by adding the following Oracle details in your pom.xml:
<dependency>
<groupId>com.oracle</groupId>
<artifactId>ojdbc5</artifactId>
<version>${oracle.version}</version>
</dependency>
================================
For dependency:
google: maven hibernate entitymanager
(deprecated Use Hibernate Core Instead) Hibernate JPA Support » 5.2.1.Final)
Thursday, August 18, 2016
Log4j Java Tutorial with Example (For Intermediate Level!)
Project Structure (I chose to work on this project structure because I had already done this project. You can start with a simple hello world project):
First of all, change the pom.xml file:
Add the following log4j dependencies:
<dependency>
<groupId>log4j</groupId>
<artifactId>log4j</artifactId>
<version>1.2.17</version>
<scope>compile</scope>
</dependency>
<dependency>
<groupId>org.slf4j</groupId>
<artifactId>slf4j-api</artifactId>
<version>1.7.18</version>
<scope>compile</scope>
</dependency>
<dependency>
<groupId>org.slf4j</groupId>
<artifactId>slf4j-log4j12</artifactId>
<version>1.7.18</version>
<scope>compile</scope>
</dependency>
<dependency>
<groupId>commons-logging</groupId>
<artifactId>commons-logging</artifactId>
<version>1.2</version>
<scope>compile</scope>
</dependency>
Whenever you change the pom file, it's always a good practice to update the maven project.
Just go to project properties >> Maven >> and update the project
Copy Paste the log4j-1.2.14.jar, slf4j-api-1.6.1.jar and slf4j-log4j12-1.6.1.jar files in the following directory:
C:\glassfish4\glassfish\domains\domain1\lib
Copy paste log4j.xml in the following directory
C:\glassfish4\glassfish\domains\domain1\lib\classes directory
Now, edit log4j.xml file with text editor and change the appender file values:
Copy the glassfish server.log location (C:\glassfish4\glassfish\domains\domain1\logs)
C://glassfish4//glassfish//domains//domain1//logs//service.log or you can simple put short url like C://mytest//spring.log
C://glassfish4//glassfish//domains//domain1//logs//dao.log
C://glassfish4//glassfish//domains//domain1//logs//sprig.log
Also, change the threshold level to DEBUG.
<param name="Threshold" value="DEBUG"/>
other threshold levels are TRACE | DEBUG | INFO | WARN | ERROR | FATAL | ALL
Make sure to match the Appender name to Appender-ref name
Also, make sure you type the package name correctly
for example: <logger name="com.cubic.rest">
Now, go to the java class file where you want to implent the logger,
for example: PersonServiceImpl.java
Inside class, initialize the log4j logging library as
private final static Logger logger = LoggerFactory.getLogger(PersonServiceImpl.class);
Now, use the log4j logger:
logger.debug("Entering PersonServiceImpl.savePerson"); //debug message goes here
logger.info("Person ID= {}, FirstName = {}",vo.getPk(),vo.getFirstName()); //info message goes here
Now, deploy the project in glassfish. Note: You should build the project successfully first.
#####IMPORTANT: Once you deploy the project successfully after a successful build (mvn clean install),
if you get any error because of issues in log4j.xml or any library related issues, you don't need to redeploy the project.
But, you need to stop the glassfish server and start it again.
asadmin start-domain
asadmin stop-domain
Now, Open Advance REST Client
Enter the url, example: http://desktop-39b14eu:9080/product-rest/ps/create
method: POST
Content-Type: application/json
Raw payload:
{
"firstName":"hariom",
"lastName":"Pandey"
}
Once you click send button and see the log file, you will see the log message like this:
2016-08-18 15:55:33,456 DEBUG http-listener-1(1) [com.cubic.service.PersonServiceImpl ] - Entering PersonServiceImpl.savePerson
2016-08-18 15:55:33,456 INFO http-listener-1(1) [com.cubic.service.PersonServiceImpl ] - Person ID= null, FirstName = hariom
2016-08-18 15:55:33,701 DEBUG http-listener-1(1) [com.cubic.service.PersonServiceImpl ] - Person Details = PersonVO [pk=45, firstName=hariom, lastName=Pandey]
2016-08-18 15:55:33,701 DEBUG http-listener-1(1) [com.cubic.service.PersonServiceImpl ] - Exiting PersonServiceImpl.savePerson
Now you are done! Let me know in comment section if you get any errors or need assistance in setting up log4j in simple project. Happy Learning. :)
**************************************
inside log4j.xml file:
<!DOCTYPE log4j:configuration SYSTEM "log4j.dtd">
<log4j:configuration xmlns:log4j="http://jakarta.apache.org/log4j/">
<appender name="SERVICELOG" class="org.apache.log4j.RollingFileAppender">
<param name="File" value="C://mytest//service.log"/>
<param name="Append" value="true"/>
<param name="MaxFileSize" value="3000KB"/>
<param name="MaxBackupIndex" value="50" />
<param name="Threshold" value="DEBUG"/>
<layout class="org.apache.log4j.PatternLayout">
<param name="ConversionPattern" value="%d %-5p %t [%-40.40c] %x - %m%n"/>
</layout>
</appender>
<appender name="DAOLOG" class="org.apache.log4j.RollingFileAppender">
<param name="File" value="C://mytest//dao.log"/>
<param name="Append" value="true"/>
<param name="MaxFileSize" value="3000KB"/>
<param name="MaxBackupIndex" value="50" />
<param name="Threshold" value="DEBUG"/>
<layout class="org.apache.log4j.PatternLayout">
<param name="ConversionPattern" value="%d %-5p %t [%-40.40c] %x - %m%n"/>
</layout>
</appender>
<appender name="SPRINGLOG" class="org.apache.log4j.RollingFileAppender">
<param name="File" value="C://mytest//spring.log"/>
<param name="Append" value="true"/>
<param name="MaxFileSize" value="3000KB"/>
<param name="MaxBackupIndex" value="50" />
<param name="Threshold" value="DEBUG"/>
<layout class="org.apache.log4j.PatternLayout">
<param name="ConversionPattern" value="%d %-5p %t [%-40.40c] %x - %m%n"/>
</layout>
</appender>
<logger name="com.cubic.rest">
<appender-ref ref="DAOLOG"/>
<level value="DEBUG"/>
</logger>
<logger name="com.cubic.service">
<appender-ref ref="SERVICELOG"/>
<level value="DEBUG"/>
</logger>
<logger name="org.springframework">
<appender-ref ref="SPRINGLOG"/>
<level value="DEBUG"/>
</logger>
<root>
<level value="DEBUG"/>
</root>
</log4j:configuration>
**************************************
Log4j dependencies for Maven, add the following code inside pom.xml file:
<dependency>
<groupId>log4j</groupId>
<artifactId>log4j</artifactId>
<version>1.2.17</version>
<scope>compile</scope>
</dependency>
<dependency>
<groupId>org.slf4j</groupId>
<artifactId>slf4j-api</artifactId>
<version>1.7.18</version>
<scope>compile</scope>
</dependency>
<dependency>
<groupId>org.slf4j</groupId>
<artifactId>slf4j-log4j12</artifactId>
<version>1.7.18</version>
<scope>compile</scope>
</dependency>
<dependency>
<groupId>commons-logging</groupId>
<artifactId>commons-logging</artifactId>
<version>1.2</version>
<scope>compile</scope>
</dependency>
********************************************************
 |
| Maven Project Structure to Test Java Log4j |
Add the following log4j dependencies:
<dependency>
<groupId>log4j</groupId>
<artifactId>log4j</artifactId>
<version>1.2.17</version>
<scope>compile</scope>
</dependency>
<dependency>
<groupId>org.slf4j</groupId>
<artifactId>slf4j-api</artifactId>
<version>1.7.18</version>
<scope>compile</scope>
</dependency>
<dependency>
<groupId>org.slf4j</groupId>
<artifactId>slf4j-log4j12</artifactId>
<version>1.7.18</version>
<scope>compile</scope>
</dependency>
<dependency>
<groupId>commons-logging</groupId>
<artifactId>commons-logging</artifactId>
<version>1.2</version>
<scope>compile</scope>
</dependency>
Whenever you change the pom file, it's always a good practice to update the maven project.
Just go to project properties >> Maven >> and update the project
Copy Paste the log4j-1.2.14.jar, slf4j-api-1.6.1.jar and slf4j-log4j12-1.6.1.jar files in the following directory:
C:\glassfish4\glassfish\domains\domain1\lib
Copy paste log4j.xml in the following directory
C:\glassfish4\glassfish\domains\domain1\lib\classes directory
Now, edit log4j.xml file with text editor and change the appender file values:
Copy the glassfish server.log location (C:\glassfish4\glassfish\domains\domain1\logs)
C://glassfish4//glassfish//domains//domain1//logs//service.log or you can simple put short url like C://mytest//spring.log
C://glassfish4//glassfish//domains//domain1//logs//dao.log
C://glassfish4//glassfish//domains//domain1//logs//sprig.log
Also, change the threshold level to DEBUG.
<param name="Threshold" value="DEBUG"/>
other threshold levels are TRACE | DEBUG | INFO | WARN | ERROR | FATAL | ALL
Make sure to match the Appender name to Appender-ref name
Also, make sure you type the package name correctly
for example: <logger name="com.cubic.rest">
Now, go to the java class file where you want to implent the logger,
for example: PersonServiceImpl.java
Inside class, initialize the log4j logging library as
private final static Logger logger = LoggerFactory.getLogger(PersonServiceImpl.class);
Now, use the log4j logger:
logger.debug("Entering PersonServiceImpl.savePerson"); //debug message goes here
logger.info("Person ID= {}, FirstName = {}",vo.getPk(),vo.getFirstName()); //info message goes here
Now, deploy the project in glassfish. Note: You should build the project successfully first.
#####IMPORTANT: Once you deploy the project successfully after a successful build (mvn clean install),
if you get any error because of issues in log4j.xml or any library related issues, you don't need to redeploy the project.
But, you need to stop the glassfish server and start it again.
asadmin start-domain
asadmin stop-domain
Now, Open Advance REST Client
Enter the url, example: http://desktop-39b14eu:9080/product-rest/ps/create
method: POST
Content-Type: application/json
Raw payload:
{
"firstName":"hariom",
"lastName":"Pandey"
}
Once you click send button and see the log file, you will see the log message like this:
2016-08-18 15:55:33,456 DEBUG http-listener-1(1) [com.cubic.service.PersonServiceImpl ] - Entering PersonServiceImpl.savePerson
2016-08-18 15:55:33,456 INFO http-listener-1(1) [com.cubic.service.PersonServiceImpl ] - Person ID= null, FirstName = hariom
2016-08-18 15:55:33,701 DEBUG http-listener-1(1) [com.cubic.service.PersonServiceImpl ] - Person Details = PersonVO [pk=45, firstName=hariom, lastName=Pandey]
2016-08-18 15:55:33,701 DEBUG http-listener-1(1) [com.cubic.service.PersonServiceImpl ] - Exiting PersonServiceImpl.savePerson
Now you are done! Let me know in comment section if you get any errors or need assistance in setting up log4j in simple project. Happy Learning. :)
**************************************
inside log4j.xml file:
<!DOCTYPE log4j:configuration SYSTEM "log4j.dtd">
<log4j:configuration xmlns:log4j="http://jakarta.apache.org/log4j/">
<appender name="SERVICELOG" class="org.apache.log4j.RollingFileAppender">
<param name="File" value="C://mytest//service.log"/>
<param name="Append" value="true"/>
<param name="MaxFileSize" value="3000KB"/>
<param name="MaxBackupIndex" value="50" />
<param name="Threshold" value="DEBUG"/>
<layout class="org.apache.log4j.PatternLayout">
<param name="ConversionPattern" value="%d %-5p %t [%-40.40c] %x - %m%n"/>
</layout>
</appender>
<appender name="DAOLOG" class="org.apache.log4j.RollingFileAppender">
<param name="File" value="C://mytest//dao.log"/>
<param name="Append" value="true"/>
<param name="MaxFileSize" value="3000KB"/>
<param name="MaxBackupIndex" value="50" />
<param name="Threshold" value="DEBUG"/>
<layout class="org.apache.log4j.PatternLayout">
<param name="ConversionPattern" value="%d %-5p %t [%-40.40c] %x - %m%n"/>
</layout>
</appender>
<appender name="SPRINGLOG" class="org.apache.log4j.RollingFileAppender">
<param name="File" value="C://mytest//spring.log"/>
<param name="Append" value="true"/>
<param name="MaxFileSize" value="3000KB"/>
<param name="MaxBackupIndex" value="50" />
<param name="Threshold" value="DEBUG"/>
<layout class="org.apache.log4j.PatternLayout">
<param name="ConversionPattern" value="%d %-5p %t [%-40.40c] %x - %m%n"/>
</layout>
</appender>
<logger name="com.cubic.rest">
<appender-ref ref="DAOLOG"/>
<level value="DEBUG"/>
</logger>
<logger name="com.cubic.service">
<appender-ref ref="SERVICELOG"/>
<level value="DEBUG"/>
</logger>
<logger name="org.springframework">
<appender-ref ref="SPRINGLOG"/>
<level value="DEBUG"/>
</logger>
<root>
<level value="DEBUG"/>
</root>
</log4j:configuration>
**************************************
Log4j dependencies for Maven, add the following code inside pom.xml file:
<dependency>
<groupId>log4j</groupId>
<artifactId>log4j</artifactId>
<version>1.2.17</version>
<scope>compile</scope>
</dependency>
<dependency>
<groupId>org.slf4j</groupId>
<artifactId>slf4j-api</artifactId>
<version>1.7.18</version>
<scope>compile</scope>
</dependency>
<dependency>
<groupId>org.slf4j</groupId>
<artifactId>slf4j-log4j12</artifactId>
<version>1.7.18</version>
<scope>compile</scope>
</dependency>
<dependency>
<groupId>commons-logging</groupId>
<artifactId>commons-logging</artifactId>
<version>1.2</version>
<scope>compile</scope>
</dependency>
********************************************************
Subscribe to:
Posts (Atom)