Wednesday, September 14, 2016

Change Java Compiler Version from pom.xml file

Add the following in your pom.xml file:
<properties>
<maven.compiler.source>1.8</maven.compiler.source>
<maven.compiler.target>1.8</maven.compiler.target>
</properties>

Quick Notes About Mockito

Unit Test Case:

JUnit Test Case:

Usually mokito is used for unit test cases. JUnit is rarely used.

autowiring - saturday
sunday: spring


Popular Mocking Unit Test:
1. Mockito
2. Easy Mock
3. Power Mock

only mock the code which you cannot setup and ....
we dont mock an implementation


we should know what we have to mock in a method


go to mockito.org to see some really good documentation


Optimized the code
next step is: mock the object but was it really called?


@Mock

@RunWith --> if we want to do all @Mock annotations, then we need to do the @RunWith annotation.


Familierize with mockito, try easy mock as well as try also power mock


times, atLeast, atMost can be used to verify how many times the method is called.
verify(dao, times(2)).createProduct(any(ProductEntity.classs) )


First we have to create a happy path scenario, then do a test coverage....


spy is a partial mock, it will only mock the things that you will tell to mock.
mock is a total mock.

mockito is much better than easy mock. no one will insist you to do a particular mock in job.


----------------------
java ee example, where we have reservation controller or ui component calling into the reservation BO
which pose the business logic and the BO calls the DAO which does the DB operations using jdbc, hibernate etc.

if we are testing the reservation controller, we mock out the reservationBo
and all the methods on the reservationBo which reservation controller methods are using
and test all the public methods on the reservation controller in isolation...

similarly, if we are testing reservationBO, we do the same for reservationDAO.

Friday, September 9, 2016

Creating a Simple ExpressJS Server

Lets create a server.js file. and add the routing information as:
//routing
app.get('/', function(req, RES){
res.redirect('/views/index.html'); //index.html file must be created inside views folder
});
Working Example server.js:
var express = require('express');
var app = express();
//setting up the static files for hosting
app.use(express.static(__dirname + '/'));

//routing
app.get('/', function(req, RES){
res.redirect('/views/index.html');
});

//... other routings

app.get('/landing', function(req, RES){
res.send('In landing page');
});
//end of routing

//launching application on localhost:1432
app.listen(1432, function(req, RES){
console.log('server loaded on port 1432');
});
Here, 
var express = require('express'); =>> it requires express folder inside the node_modules folder. For this execute the following command:
npm install --save-dev express


also, give any port for the server as:
//launching application on localhost:1432
 //you can put whatever port you want but that shouldn't be already used.
app.listen(1432, function(req, RES){
console.log('server loaded on port 1432');
});

Now, go to the cmd and enter:
node server //or node server.js
then, it will display the following console.log msg:
server loaded on port 1432
After that, if you enter 
http://localhost:1432/views/index.html
in the browser, it will work.


Sunday, September 4, 2016

View EndPoint is not Available on GlassFish

If you are writing a SOAP Webservice, then you may face the following situation once you deploy your project on GlassFishServer:

There is a "Launch" action available under the "Modules and Components" section but "View Endpoint" is not available.

In that case, you can solve this issue by changing the web.xml file (which is available under WEB-INF folder) of your project as follows:

<web-app xmlns="http://java.sun.com/xml/ns/javaee" xmlns:xsi="http://www.w3.org/2001/XMLSchema-instance"
version="2.5"
xsi:schemaLocation="http://java.sun.com/xml/ns/javaee 
http://java.sun.com/xml/ns/javaee/web-app_2_5.xsd">
  <display-name>Archetype Created Web Application</display-name>
</web-app>

Then, redeploy your project and then you are good to go! Good Luck.

WebService Client Tester is not Working on GlassFish Server

If you are writing a SOAP Webservice, then you may face the following situation:

WSDL: (/YourProject/YourService?wsdl) is working fine but 
Tester (/YourProject/YourService?Tester) is not working 

Then, this can be solved using:
Create a new text file and rename it jaxp.properties (if it doesn't exist under /path/to/jdk1.8.0/jre/lib) and then write this line in it: javax.xml.accessExternalSchema = all

Then, restart the glassfish server and you are good to go! Good Luck.

There is another way to fix this if you are facing this problem when working on a Maven Web Project:
(Since the above solution perfectly worked for me, I didn't test this solution:)


If you are using the jaxws Maven plugin and you get the same error message, add the mentioned property to the plugin configuration:

...
<plugin>
  <groupId>org.jvnet.jax-ws-commons</groupId>
  <artifactId>jaxws-maven-plugin</artifactId>
  <version>2.3</version>
  <configuration>
    <!-- Needed with JAXP 1.5 -->
    <vmArgs>
        <vmArg>-Djavax.xml.accessExternalSchema=all</vmArg>
    </vmArgs>
  </configuration>
</plugin>

I found the above plugin configuration on StackOverflow.

Saturday, August 27, 2016

18 Things You Should Know About GIT (From Basics to Advanced)

Here are the things every developer should know about GitHub:

===========================================
Basics:
1. Installing git
2. Configuring git
3. Creating a new repository (git init)
4. Checking the status (git status)
5. Staging (git add)
6. Commiting (git commit)

Remote Repositories:
1. Connecting to a remote repository (git remote add)
2. Uploading to a server (git push)
3. Cloning a repository (git clone)
4. Getting changes from a server (git pull)

Branches:
1. Creating new branches (git branch)
2. Switching branches (git checkout)
3. Merging branches (git merge)

Advanced:
1. Checking difference between commits
2. Reverting a file to a previous version
3. Fixing a commit
4. Resolving Merge Conflicts
5. Setting up .gitignore
===========================================
And here is the git cheat sheet for you:

It appears you don't have a PDF plugin for this browser. No biggie... you can click here to download the PDF file.

Tuesday, August 23, 2016

Creating a New User in Oracle Database 11g Express Edition

This post describes how to create a New User in Oracle Database 11g Express Edition:

Go to cmd and type sqlplus
Then it will ask you for the user-name and password.
Enter user-name: sys
Enter password: vijaya
It will show you the following error:
ERROR:
ORA-28009: connection as SYS should be as SYSDBA or SYSOPER

So, just try the another role you've created.
Enter username: vijaya
Enter password: vijaya

Now it will say:
Connected to:
Oracle Database 11g Express Edition Release 11.2.0.2.0 - 64bit Production

////////////////////////
Or, if you directly open "Run SQL command line", it will directly go to:
">SQL" instead of "C:\Users\meVeekay>", so you can directly do:
SQL> conn sys as sysdba
and it will ask you for the password. Once you enter your password, it will connect you to the database.
////////////////////////

Now, try sys login as sysdba role:
SQL> conn sys as sysdba
Enter password: vijaya
Connected.
Now, you can create a new user:
SQL> create user vkpandey identified by vijaya;
Once the user is created, you need to give sysdba role to the new user:
SQL> grant sysdba to vkpandey;
Now, it should show you the "Grant succeeded." message.


Now, if you open SqlDeveloper tool and try to create a new database connection with the username and password you just created,
it will display the following error:
User Lacks CREATE SESSION Privilege, Logon Failed
this is because you haven't given the session privilege.
To solve this issue, we can do:
//GRANT CONNECT TO username;
GRANT CONNECT TO vkpandey;

Depending on the Oracle version, however, the CONNECT role has many more privileges than the name suggests.
So good idea is to grant CREATE SESSION instead. So simply do:
SQL> grant create session to vkpandey;
Grant succeeded.

Now you can create a new database connection in Oracle SqlDeveloper Tool:
For example:
Connection name: VKConnection
Username: vkpandey
password: vijaya
Hostname: localhost
port: 1521
SID: xe

Try Test option, it should show you "Status: Success" message.
Now, enter Connect button.

So, in Summary:

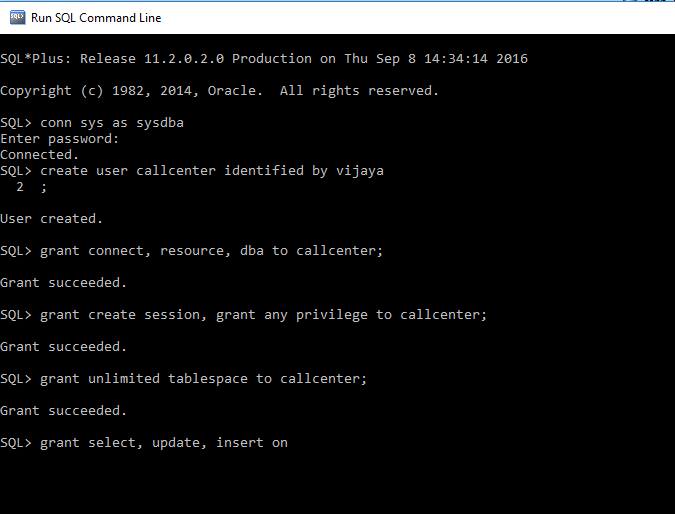
Follow the below steps for creating a user in Oracle.
--Connect as System user
CONNECT <USER-NAME>/<PASSWORD>@<DATABASE NAME>;

--Create user query
CREATE USER <USER NAME> IDENTIFIED BY <PASSWORD>;

--Provide roles
GRANT CONNECT,RESOURCE,DBA TO <USER NAME>;

--Provide privileges
GRANT CREATE SESSION, GRANT ANY PRIVILEGE TO <USER NAME>;
GRANT UNLIMITED TABLESPACE TO <USER NAME>;

--Provide access to tables.
GRANT SELECT,UPDATE,INSERT ON <TABLE NAME> TO <USER NAME>;

Creating a New User in Oracle Database 11g Express Edition
Getting Insufficient Privileges when creating tables in Oracle SQL Developer Error??
If you get the following error message when creating a new table from sql developer tool:
java.sql.sqlsyntaxerrorexception ora-01031 insufficient privileges

Run the following command from a privileged user and re-connect with your user:
GRANT RESOURCE to my_user;
//GRANT RESOURCE to vkpandey;

Add Oracle JDBC Driver in Maven Local Repository

Due to Oracle license restriction, there is NO public Maven repository provides Oracle JDBC driver.
To use Oracle jdbc drive with Maven, you have to install it manually into your Maven local repository.

Here’s a guide to show you how to add an Oracle JDBC driver (“ojdbc6.jar“) into your Maven local repository,
and also how to reference it in pom.xml.

1. Get Oracle JDBC Driver
There are two different ways to get the Oracle jdbc driver :
a. go to Oracle.com and find it.
b. Oracle database installed folder, for example, “{ORACLE_HOME}\jdbc\lib\ojdbc6.jar“
that is,
go to C:\oraclexe\app\oracle\product\11.2.0\server\jdbc\lib and find ojdbc5.jar or ojdbc6.jar

2. Install OJDBC driver:
To install your Oracle jdbc driver, enter the following command :
mvn install:install-file -Dfile={Path/to/your/ojdbc.jar} -DgroupId=com.oracle -DartifactId=ojdbc6 -Dversion=11.2.0.3 -Dpackaging=jar

Or,
go to C:\oraclexe\app\oracle\product\11.2.0\server\jdbc\lib and find ojdbc5.jar or ojdbc6.jar
copy ojdbc5.jar file and put in c:\temp folder
open cmd/terminal window from c:\temp folder and enter the following command:
mvn install:install-file -Dfile=ojdbc5.jar -DgroupId=com.oracle -DartifactId=ojdbc5 -Dversion=11.2.0.3 -Dpackaging=jar

Once you execute the code, you will see the following message:
C:\TEMP>mvn install:install-file -Dfile=ojdbc5.jar -DgroupId=com.oracle -DartifactId=ojdbc5 -Dversion=11.2.0.3 -Dpackaging=jar
[INFO] Scanning for projects...
[INFO]
[INFO] ------------------------------------------------------------------------
[INFO] Building Maven Stub Project (No POM) 1
[INFO] ------------------------------------------------------------------------
[INFO]
[INFO] --- maven-install-plugin:2.4:install-file (default-cli) @ standalone-pom ---
[INFO] Installing C:\TEMP\ojdbc5.jar to C:\Users\meVeekay\.m2\repository\com\oracle\ojdbc5\11.2.0.3\ojdbc5-11.2.0.3.jar
[INFO] ------------------------------------------------------------------------
[INFO] BUILD SUCCESS
[INFO] ------------------------------------------------------------------------
[INFO] Total time: 1.220 s
[INFO] Finished at: 2016-07-18T15:41:03-06:00
[INFO] Final Memory: 7M/77M
[INFO] ------------------------------------------------------------------------

3. Now, You are all set! Oracle JDBC Driver ojdbc5.jar is installed in your Maven local repository.

4. Now you can reference it by adding the following Oracle details in your pom.xml:
<dependency>
<groupId>com.oracle</groupId>
<artifactId>ojdbc5</artifactId>
<version>${oracle.version}</version>
</dependency>


================================
For dependency:

google: maven hibernate entitymanager
(deprecated Use Hibernate Core Instead) Hibernate JPA Support » 5.2.1.Final)

Thursday, August 18, 2016

Log4j Java Tutorial with Example (For Intermediate Level!)

Project Structure (I chose to work on this project structure because I had already done this project. You can start with a simple hello world project):
Maven Project Structure to Test Java Log4j 
First of all, change the pom.xml file:
Add the following log4j dependencies:
<dependency>
<groupId>log4j</groupId>
<artifactId>log4j</artifactId>
<version>1.2.17</version>
<scope>compile</scope>
</dependency>

<dependency>
<groupId>org.slf4j</groupId>
<artifactId>slf4j-api</artifactId>
<version>1.7.18</version>
<scope>compile</scope>
</dependency>

<dependency>
<groupId>org.slf4j</groupId>
<artifactId>slf4j-log4j12</artifactId>
<version>1.7.18</version>
<scope>compile</scope>
</dependency>

<dependency>
<groupId>commons-logging</groupId>
<artifactId>commons-logging</artifactId>
<version>1.2</version>
<scope>compile</scope>
</dependency>

Whenever you change the pom file, it's always a good practice to update the maven project. 
Just go to project properties >> Maven >> and update the project

Copy Paste the log4j-1.2.14.jar, slf4j-api-1.6.1.jar and slf4j-log4j12-1.6.1.jar files in the following directory:
C:\glassfish4\glassfish\domains\domain1\lib

Copy paste log4j.xml in the following directory
C:\glassfish4\glassfish\domains\domain1\lib\classes directory

Now, edit log4j.xml file with text editor and change the appender file values:
Copy the glassfish server.log location (C:\glassfish4\glassfish\domains\domain1\logs)
C://glassfish4//glassfish//domains//domain1//logs//service.log or you can simple put short url like C://mytest//spring.log
C://glassfish4//glassfish//domains//domain1//logs//dao.log
C://glassfish4//glassfish//domains//domain1//logs//sprig.log

Also, change the threshold level to DEBUG.
<param name="Threshold" value="DEBUG"/>
other threshold levels are TRACE | DEBUG | INFO | WARN | ERROR | FATAL | ALL

Make sure to match the Appender name to Appender-ref name

Also, make sure you type the package name correctly
for example: <logger name="com.cubic.rest">

Now, go to the java class file where you want to implent the logger,
 for example: PersonServiceImpl.java
Inside class, initialize the log4j logging library as
private final static Logger logger = LoggerFactory.getLogger(PersonServiceImpl.class);

Now, use the log4j logger:
logger.debug("Entering PersonServiceImpl.savePerson"); //debug message goes here
logger.info("Person ID= {}, FirstName = {}",vo.getPk(),vo.getFirstName()); //info message goes here

Now, deploy the project in glassfish. Note: You should build the project successfully first.
#####IMPORTANT: Once you deploy the project successfully after a successful build (mvn clean install),
if you get any error because of issues in log4j.xml or any library related issues, you don't need to redeploy the project.
But, you need to stop the glassfish server and start it again.
asadmin start-domain
asadmin stop-domain


Now, Open Advance REST Client
Enter the url, example: http://desktop-39b14eu:9080/product-rest/ps/create
method: POST
Content-Type: application/json
Raw payload:
{
  "firstName":"hariom",
  "lastName":"Pandey"
}
Once you click send button and see the log file, you will see the log message like this:
2016-08-18 15:55:33,456 DEBUG http-listener-1(1) [com.cubic.service.PersonServiceImpl     ]  - Entering PersonServiceImpl.savePerson
2016-08-18 15:55:33,456 INFO  http-listener-1(1) [com.cubic.service.PersonServiceImpl     ]  - Person ID= null, FirstName = hariom
2016-08-18 15:55:33,701 DEBUG http-listener-1(1) [com.cubic.service.PersonServiceImpl     ]  - Person Details = PersonVO [pk=45, firstName=hariom, lastName=Pandey]
2016-08-18 15:55:33,701 DEBUG http-listener-1(1) [com.cubic.service.PersonServiceImpl     ]  - Exiting PersonServiceImpl.savePerson

Now you are done! Let me know in comment section if you get any errors or need assistance in setting up log4j in simple project. Happy Learning. :)


**************************************
inside log4j.xml file:
<!DOCTYPE log4j:configuration SYSTEM "log4j.dtd">
<log4j:configuration xmlns:log4j="http://jakarta.apache.org/log4j/">
<appender name="SERVICELOG" class="org.apache.log4j.RollingFileAppender">
<param name="File" value="C://mytest//service.log"/>
<param name="Append" value="true"/>
<param name="MaxFileSize" value="3000KB"/>
<param name="MaxBackupIndex" value="50" />
<param name="Threshold" value="DEBUG"/>
<layout class="org.apache.log4j.PatternLayout">
<param name="ConversionPattern" value="%d %-5p %t [%-40.40c] %x - %m%n"/>
</layout>
</appender>
<appender name="DAOLOG" class="org.apache.log4j.RollingFileAppender">
<param name="File" value="C://mytest//dao.log"/>
<param name="Append" value="true"/>
<param name="MaxFileSize" value="3000KB"/>
<param name="MaxBackupIndex" value="50" />
<param name="Threshold" value="DEBUG"/>
<layout class="org.apache.log4j.PatternLayout">
<param name="ConversionPattern" value="%d %-5p %t [%-40.40c] %x - %m%n"/>
</layout>
</appender>
<appender name="SPRINGLOG" class="org.apache.log4j.RollingFileAppender">
<param name="File" value="C://mytest//spring.log"/>
<param name="Append" value="true"/>
<param name="MaxFileSize" value="3000KB"/>
<param name="MaxBackupIndex" value="50" />
<param name="Threshold" value="DEBUG"/>
<layout class="org.apache.log4j.PatternLayout">
<param name="ConversionPattern" value="%d %-5p %t [%-40.40c] %x - %m%n"/>
</layout>
</appender>
<logger name="com.cubic.rest">
<appender-ref ref="DAOLOG"/>
 <level value="DEBUG"/>
</logger>
<logger name="com.cubic.service">
<appender-ref ref="SERVICELOG"/>
 <level value="DEBUG"/>
</logger>
<logger name="org.springframework">
<appender-ref ref="SPRINGLOG"/>
 <level value="DEBUG"/>
</logger>
<root>
  <level value="DEBUG"/>
</root>
</log4j:configuration>

**************************************
Log4j dependencies for Maven, add the following code inside pom.xml file:
<dependency>
<groupId>log4j</groupId>
<artifactId>log4j</artifactId>
<version>1.2.17</version>
<scope>compile</scope>
</dependency>

<dependency>
<groupId>org.slf4j</groupId>
<artifactId>slf4j-api</artifactId>
<version>1.7.18</version>
<scope>compile</scope>
</dependency>

<dependency>
<groupId>org.slf4j</groupId>
<artifactId>slf4j-log4j12</artifactId>
<version>1.7.18</version>
<scope>compile</scope>
</dependency>

<dependency>
<groupId>commons-logging</groupId>
<artifactId>commons-logging</artifactId>
<version>1.2</version>
<scope>compile</scope>

</dependency>
********************************************************

Wednesday, July 6, 2016

Some Basic Oracle DDL and DCL Commands

DDL COMMANDS: ALTER: This can be used to add (or) remove columns and to modify the precision of data type. syntax: alter table <table name> add <col... datatype> eg. alter table student add sdob date; alter table student drop sdob date; To change the precision: alter table student modify id number(5); Make a column unused: alter table student set unused column marks Rename column: Alter table student rename column name to sname; Using Truncate: This can be used to delete table data permanently. Syntax: truncate table <table name> truncate table student; Drop: this will be used to drop the database object. syntax: drop table <table name> drop table student; Rename: it will be used to rename the database object. syntax: rename table <table name> to <table name> rename table student to stud; Commit: this will be used to save th work. Two types of commit: a. implicit commit b. explicit commit Explicit commit: this will be issued by the user. syntax: commit or commit work; Rollback: this will undo the operation it will be issued in two methods 1. upto previous commit 2. upto previous rollback syntax: roll or roll work or rollback or rollback work Savepoint: you can use savepoint to rollback portions of your current set of transactions. syntax: savepoint <save point name> eg. savepoint s1; insert into student values (1, 'brook', 90); savepoint s2; insert into student values (2, 'DJ', 80); savepoint s3; rollback s2; USING DCL: DCL commands are used to grant and revoke the permissions. Using Grant: This will be used to grant the privileges to users. Syntax: Grant <privileges> on <object name> to <user name>; grant select on student to seema; [most of the time grant and revoke will be done by DBA.] or, grant all on student to seema; [we have given all the previliges to seema] grant all on student to seema with grant option; if you want to allow seema to give grant permissions to other; revoke select on student from seema; revoke all on student from seema; Multiinsert with all fields: insert all into student values (3, 'Rabi', 93) into student values (4, 'Hari', 96) into student values (5, 'Anup', 90) select * from dept where deptno = 10; select greatest (1, 2, 3), greatest(-1, -2, -3) from dual; [dual is a table inside the system, and there is nothing in the table] initcap: make the first letter capitalized. CONSTRAINTS (RESTRICTIONS): Constraints are categorized as follows: 1. domain integrity constraint a. Notnull constraint b. check 2. Entity integrity constraint a. unique b. primary key 3. Referencial integrity constraint a. foreign key constraint - Constraints are always attached to the column not to the table. - We can add constraints in three ways a. column level: always with the column definition b. table level: after the table definition c. alter level: using alter command

Tuesday, July 5, 2016

Java for Beginners - Things You Should Do:

Things you should do:
Install JDK and JRE.
Install Eclipse EE (Neon is Good)
Install Oracle XE 11g.
Install Oracle SQL Developer
Install Apache Tomcat

Oracle SQL Command Line Tricks for Beginners

This is Oracle SQL Command Line Tricks for beginners. Simply do the following:

1. First Open "Run SQL Command Line"
2. Type conn username/password
 For example: conn SYSTEM/vijaya
or simply you can type: conn
Then, it will ask for username. It will show "Enter user-name:", type "vijaya"
Then, it will ask for password. Enter your password: Vijaya
Voila! You're connected.

Type:
select * from student
It will display "2" because you didn't enter semicolon after sql query. enter semicolon.

Then, you will see the table data from student.

If you don't have any table, you can simply create a database using:
create table student(
id int not null,
name varchar(20) not null,
marks int,
primary key (id)
);

To insert new data, you can simply do the following:
insert into student values (1, 'Vijaya', 80);

Or, you can insert by doing:

insert into student values (&id, '&name', &marks);
then, it will display:
Enter value for id: (enter your id) eg. 2
Enter value for name: (enter your name) eg. Hari
Enter value for marks: (enter your marks) eg. 78
Hit Enter,
then it will display:
1 row created.

If you want to commit your changes, type: commit; and hit enter.
then, you will see "commit complete" message.

If you want to insert multiple rows into the table, you can simply type forward slash "/" and hit enter.
It will repeat the same message again:
Enter value for id: (enter your id)
Enter value for name: (enter your name)
Enter value for marks: (enter your marks)
Hit Enter.

This is tested on Windows 10, Oracle XE 11g.

Tuesday, June 28, 2016

MySQL JDBC jar File on OpenSUSE

First Method:
1. sudo zypper install mysql-connector-java (or go to Software Management and search for jdbc, you will find mysql-connector-java package).
2. Once it's installed, you'll have the file /usr/share/java/mysql-connector-java.jar (/usr/share/java/mysql.jar), which is an indirect symlink to the actual jar file.
3. in Eclipse, do this as: Project -> Properties -> Java Build Path -> Libraries -> Add External JARs -> select /usr/share/java/mysql-connector-java.jar


Or, Second Method:

Download the MySQL JDBC connector from http://www.mysql.com/downloads/connector/j/5.1.html.
[Platform Independent (Architecture Independent), Compressed TAR Archive]
Extract the JDBC driver JAR file from the downloaded file; for example:
tar zxvf mysql-connector-java-5.1.39.tar.gz 

Add the JDBC driver, renamed, to the relevant server; for example:
$ sudo cp mysql-connector-java-5.1.39/mysql-connector-java-5.1.39-bin.jar /usr/share/java/mysql-connector-java.jar
If the target directory does not yet exist on this host, you can create it before copying the .jar file; for example:
$ sudo mkdir -p /usr/share/java/
$ sudo cp mysql-connector-java-5.1.39/mysql-connector-java-5.1.39-bin.jar /usr/share/java/mysql-connector-java.jar

I did the first method.

******************************
Test if JDBC Connection is Suffessful:

import java.sql.*;  
class JdbcTest{  
public static void main(String[] args) throws Exception {  
System.out.println("Connecting database...");

Connection connection = null;
String url = "jdbc:mysql://localhost:3306/cs_project";
String username = "root";
String password = "vijaya";
try {
Class.forName("com.mysql.jdbc.Driver");  
connection = DriverManager.getConnection(url, username, password);
System.out.println("Connection Successful.");
// Success.
} catch (SQLException e) {
// Fail.
System.out.println("Connection Failed."+e);
} finally {
if (connection != null) try { connection.close(); } catch (SQLException ignore) {}
}
}  
}  

Tuesday, June 21, 2016

Install Sublime Text on OpenSUSE

Download Sublime Text tarball from the following link:
http://www.sublimetext.com/3
(Ubuntu 64 bit - also available as a tarball for other Linux distributions.)

Extract the downloaded file sublime_text_3_build_3114_x64.tar.bz2

Once unpacked, you will get a directory called “sublime_text_3″, inside this directory you will see a list files that required by Sublime Text to run.
For example, go to the folder sublime_text_3 and open new terminal window and type ./sublime_text, sublime text editor will open. But everytime, doing this way to open a sublime text editor is not a good idea.

For security reason, we move this folder under “/opt” location. For this enter the following command:
sudo mv sublime_text_3 /opt/ 
sudo mv Sublime\ Text\ 3 /opt/ (if folder name is Sublime Text 3)

Next create a symbolic link to call “Sublime Text” from the command line as “sublime”. To do, create a symbolic link under “/usr/bin” as shown below.
sudo ln -s /opt/sublime_text_3/sublime_text /usr/bin/sublime

Now, you are ready to use sublime text. Just type sublime in terminal, sublime text editor will open.

Regular Expression in Java for Email Validation

class RegexTest {
   public static void main(String[] args) {

      String my_regex = "^[a-z0-9._]+@[a-z0-9.-]+\\.[a-z]{2,3}$";
     
      String my_email = "tekendra587@gmail.com";
      Boolean b = my_email.matches(my_regex);
      System.out.println("Email address "+my_email+" is: " + b);
     
      String my_another_email = "user^domain.co.in";
      b = my_another_email.matches(my_regex);
      System.out.println("Email address "+my_another_email+" is: " + b);
   }
}

Sunday, June 19, 2016

Changing Extension to Multiple Files on OpenSUSE

To change extension of multiple files (suppose all .txt files to .jpg), open terminal and execute the following command:

rename txt jpg *.txt

Explanation: here, it replaces the every occurrence of txt to jpg in all file matching "*.txt"

To change back to .txt, execute the following command:

rename jpg txt *.jpg

Friday, June 17, 2016

Print Object in Java

To print objects in Java, we can use toString() method.
toString() method belongs to object class.

class Student{
String name;
int id;
String city;

Student(String name, int id, String city){
this.name = name;
this.id = id;
this.city = city;
}
public String toString(){
return " Name: "+name + " id: "+id + " city: "+city;
}

public static void main(String[] args){
Student S1 = new Student("Dj", 111, "Irving");
Student S2 = new Student("Rabi", 222, "Dallas");
System.out.println(S1);
System.out.println(S2);
}
}

Now, the output will be:
               Name: Dj id: 111 city: Irving
Name: Rabi id: 222 city: Dallas

If we don't use the toString() method and directly print the object, we get some garbage values that we cannot understand.

Thursday, June 16, 2016

ArrayList Concept in Java [2D ArrayList Java]:

import java.util.*;
class TestArrayList {
 public static void main(String args[]) {
  Scanner input = new Scanner(System.in);

  ArrayList al = new ArrayList();
  for (int i = 0; i < 2; i++) {
   System.out.print("Enter food :"); //example: Momo, 2
   String user_input = input.nextLine();
   String formatted_input[] = user_input.split("\\,"); //split into 1 D array
   al.add(formatted_input); //append it to a 2D list
  }

  System.out.println("******************\nMethod 1: to print 2D array list:");
  for (int i = 0; i < al.size(); i++) { //if it is arraylist, we need to use size() instead of .length
   String newarr[] = new String[2];
   newarr = al.get(i); //get subarray in newarr
   System.out.print(newarr[0] + " " + newarr[1] + "\n"); //get 0th and 1th element 
   //if the subarray is large, we need to use another for loop instead of just using 0 and 1
  }

  System.out.println("******************\nMethod 2: to print 2D array list: ");
  for (String[] ob : al) {
   System.out.println(ob[0] + " " + ob[1]);
  }
 }
}

Friday, February 26, 2016

Thursday, February 18, 2016

Core Courses CS NMSU

INSERT INTO `tbl_core_courses` (`id`, `department_id`, `subj`, `crse`, `credit`, `title`) VALUES
(127, 1, 'CS', 510, 3, 'AUTOMATA, LANG, COMP'),
(128, 1, 'CS', 550, 3, 'COMPLEXITY THEORY'),
(129, 1, 'CS', 570, 3, 'ANALYSIS OF ALGORITHMS'),
(130, 1, 'CS', 571, 3, 'OPERATING SYSTEMS 2'),
(131, 1, 'CS', 572, 3, 'ADVANCED ALGORITHMS'),
(132, 1, 'CS', 573, 3, 'ARCHITECTURAL CNCPT 2'),
(133, 1, 'CS', 574, 3, 'OPERATING SYSTEMS 2'),
(134, 1, 'CS', 575, 3, 'ARTIFICIAL INTLGNCE II'),
(135, 1, 'CS', 580, 3, 'COMPILER CONSTRUCTION'),
(136, 1, 'CS', 581, 3, 'ADV SOFTWARE ENGR'),
(137, 1, 'CS', 582, 3, 'DATABASE MGT SYST II'),
(138, 1, 'CS', 584, 3, 'COMPUTER NETWORKS II'),
(139, 1, 'CS', 586, 3, 'ALGORITHMIC SYSTEMS BIOLOGY');

Project Backup code

%clingo 0 -c length=4 q5.lp
%clingo 0 test.lp
semesters(1..2).
course(1..3).

available(cs574).
available(cs518).
available(cs579).
available(cs581).
available(cs582).
available(cs584).

taken(cs518).
taken(cs584).

cantake(A) :- available(A), not taken(A). %see the difference between :- and :

2{can(A): cantake(A)}3.

#show can/1.


Wednesday, February 10, 2016

Connect VPN Client on OpenSUSE

Once you install the vpnsetup.sh file using the following command:
sudo sh yoursetupfile.sh

your vpn software will be installed on the following location:
/opt/cisco

Now, navigate to:
/opt/cisco/anyconnect/bin

Open Terminal and Enter the following command:
 ./vpn connect vpn.nmsu.edu

Then you'll see the following screen:
Cisco AnyConnect Secure Mobility Client (version 3.1.04072) .

Copyright (c) 2004 - 2013 Cisco Systems, Inc.  All Rights Reserved.


  >> state: Disconnected
  >> state: Disconnected
  >> notice: Ready to connect.
  >> registered with local VPN subsystem.
  >> contacting host (vpn.nmsu.edu) for login information...
  >> notice: Contacting vpn.nmsu.edu.

  >> Connection Banner
  >> ©2014 NMSU Board of Regents

  >> Please enter your myNMSU username and password.
    0) NMSU
    1) NMSU-Full
    2) banner
Group: [NMSU]

Enter NMSU as a group.

Then, you'll be asked to enter username. Enter your nmsu username
Then, finally enter your nmsu password and you're done.

If you want to check if the connection is established, enter the following command again
 ./vpn connect vpn.nmsu.edu

and you'll see:
Cisco AnyConnect Secure Mobility Client (version 3.1.04072) .

Copyright (c) 2004 - 2013 Cisco Systems, Inc.  All Rights Reserved.


  >> state: Connected
  >> state: Connected
  >> notice: Connected to Not Available.
  >> registered with local VPN subsystem.
  >> contacting host (vpn.nmsu.edu) for login information...
  >> state: Connected
  >> state: Connected

Install .sh file on Opensuse

1. Download the .sh file
2. Navigate to the location where .sh file is located
3. Type the following command:

sudo sh yoursetupfile.sh

Now you're done!

Thursday, January 28, 2016

Install PhpStorm on OpenSUSE

1. Download PhpStorm from JetBrains
2. Unzip the folder and copy it into a destination where you want to keep.
3. Go To the copied folder and navigate into Bin folder.
4. In a bin folder, open terminal window.
5. Type ./phpstorm.sh and hit Enter
6. Then you're done! :)

Kate Terminal Not Working on OpenSUSE

If Kate terminal is not working on your OpenSUSE device, it might be because of konsole not being installed on your computer.

Just enter the following command in terminal to install konsole:

sudo zypper in konsole

and then it should work.
Good Luck!